Skilling
Sploosh's Efficient Slayer Training Guide
Step-by-step guide on training slayer 3x faster, starting from level 1.
Sploosh’s Slayer Suggestions (SSS)
How I Learned to Stop Worrying and Love the Skip
Welcome to the easiest guide you’ll ever read for unlocking and training the Slayer skill in Old School RuneScape. Have you ever asked yourself “How do I train slayer efficiently?”, or “Do I really have to kill 187 trolls? This fucking sucks.” This is the guide for you.
This article is a no-explanation, step-by-step guide on exactly what to do. Keep your eyes peeled for a future fully explained guide for folks who like numbers and efficiency. Following this guide enables the execution of leveling slayer with xp rates 3x or faster than just blindly doing every task.
There is a companion guide to this → LINK Fastest Slayer Task Transportation
Prerequisites
Core Progression
—> Fairy Ring Access
You only have to complete the first few steps of the quest. You do not need the prerequisite skills.
—> Easy Tier of Ardougne Diary
Rewards the Ardougne Cloak 1, which provides an unlimited teleport close to a Fairy Ring. Other options for fairy ring teleports exist.
—> Animal Magnetism
Unlocks BiS range cape, saves 80% of all ammunition fired.
—> Temple of the Eye
Gives a ton of Runecrafting xp, also gives access to Guardians of the Rift minigame.
—> Priest in Peril
Access to Morytania.
—> Ghosts Ahoy
Rewards you with the Ectophial, a very useful teleport item.
—> Monkey Madness 1
Dragon scimitar is good melee weapon.
—> Barrows Gloves
You’re wasting time if you’re grinding slayer before finishing Recipe for Disaster.
—> 65 atk / 65 str / 65 range / 62 magic
( ͡° ͜ʖ ͡°)
—> Dragon Defender
This is the greatest melee offhand out there and will be used in many situations.
—> Desert Treasure I
Unlocks the Ancient spellbook + Ancient Staff (for irons to autocast ancients, mains can buy whatever)
—> Lunar Diplomacy
Unlocks the Lunar Spellbook, We will use the NPC Contact spell
—> Finish quests for 200 quest points
Every 50 quest points you get, you can block one monster - preventing a slayer master from assigning it. Four blocks is minimum, six blocks (300 quest points) is helpful but not required.
Unlocks, Equipment, Teleports
—> Black Mask (i)
YOU MUST IMBUE THIS.This item gives a HUGE dps increase on slayer tasks. Must be imbued to work for magic/range. This will eventually be built into your slayer helm.
—> Rosewood Blowpipe
Great weapon for points boosting. Irons can use Magic Shortbow.
—> Ring of the Elements
Play Guardians of the Rift to get this.
Yes, it sucks. Yes, it’s worth it.
—> Skull Sceptre (i)
YOU MUST IMBUE THIS.You’ll have to kill several different enemies in the Stronghold of Security that drop pieces you’ll combine to make the full sceptre. Be sure to get some extra pieces to recharge it.
—> Xeric’s Talisman
Kill Lizardman in Shayzien. The drop rate increases a lot if you do the Kourend & Kebos Easy Diary.
Pick up all the extra fangs they drop so you can charge it. 100 charges will last a very long time.
—> Bullseye Lantern
This is an inextinguishable lightsource that you will take for tasks in the Lumbridge Swamp Caves.
—> Combat Bracelets
Relatively common task of Icefiends, fastest teleport is Combat Bracelet > Monestary. Can be replaced with House Teleport Tablets by having a Fancy Jewelry Box in your PoH at 78 construction.
—> Varrock Teleport Tablets
Common task for Rats, closest group is in the Varrock Sewers. This can be replaced with House Teleport Tablets by having a Varrock Teleport Portal in your Player Owned House (level 50 construction).
—> Lumbridge Teleport Tablets
Common task for Spiders, closest group is near the HAM hideout west of Lumbridge Castle. This can be replaced with House Teleport Tablets by having a Lumbridge Teleport Portal in your Player Owned House (level 50 construction).
—> Bracelets of Slaughter and Expeditious Bracelets
Stack lots of these (~50ish should be a good start). The Slaughter makes your tasks longer, and the Expeditious makes them shorter. Both by about 25%.
QoL Items / Helpful not Required
—> Fire Cape
Jad is frustrating.
You spend an hour and a half getting there and right as Jad appears, your wife’s boyfriend makes you refill his beer and you wipe.
We mostly use range in this guide. Still, it’s worth doing. At least send attempts while you’re taking a break from this guide. It’s the difference being a noob and just beeing a bit nooby.
—> Rune Pouch
The Rune Pouch saves several inventory spaces while we’re bursting. Not make-or-break, but a staple for the rest of the game.
Quickest (but also most frustrating) from Last Man Standing, but you can also get it from Slayer.
It costs a whopping 750 slayer points so you can technically add an extra 750 points to the “Phase 1” section listed below to knock this out.
—> 75 Crafting
With 75 crafting, you can make your own Slayer Rings, which provide teleports to key locations we’ll be visiting frequently.
—> Dwarf Multicannon
Do the quest, pay 750k for the cannon, and craft a few thousand cannonballs. This will speed up some tasks (especially Bats and Sulphur Lizards).
—> Hard Tier of Kourend and Kebos Diary
Gives us the Rada’s Blessing 3, which allows three daily teleports to Mount Karuulm. Saves time getting to Lizard tasks.
Also provides a ton of other QoL like 5% increased herbs in the Hosius and Farming Guild herb patches.
Gigachad Tier QoL
—> Elite Tier of the Lumbridge and Draynor Diary
Not only does this eliminate the requirement to have a Dramen Staff when using fairy rings, but it also gives you a free seventh slot to block slayer tasks, increasing xp/hr (slightly).
—> Elite Tier of the Kourend and Kebos Diary
This gives you 11% more Slayer Reward Points when completing a Konar Task.
Phase 1 - Slayer Points Farming
We will use the Mazchna/Konar method to farm enough slayer points to get unlocks/blocks/etc. needed to efficiently train slayer.
If you follow this method for all unlocks you will end up at level ~62 Slayer.
Preparation
1. Ensure that you have no active slayer task.
2. Swap to Lunar Spellbook.
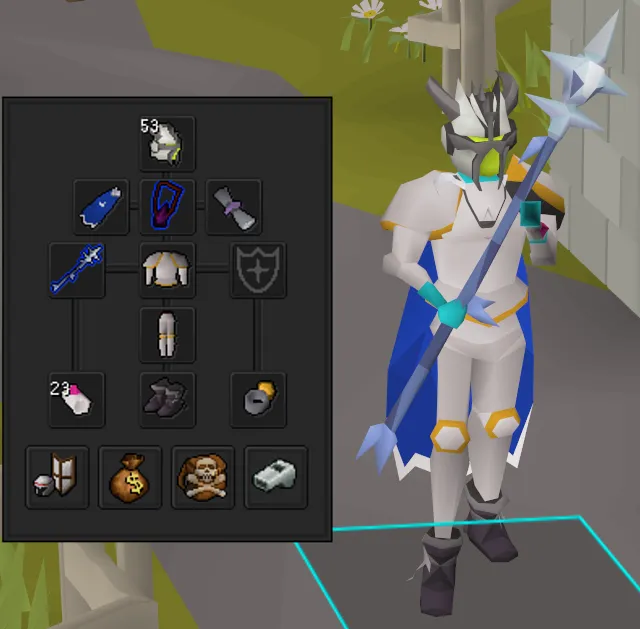
3. Set up your equipment as shown below.
4. Set up your inventory as shown below.
Equipment
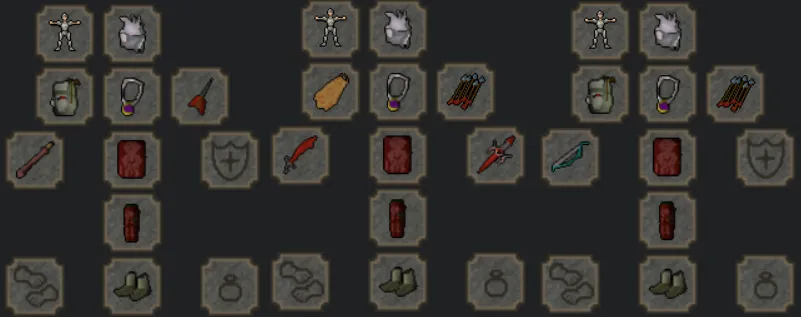
For Mazchna tasks, the Rosewood Blowpipe shines and almost hits 7 dps on some tasks. Improvements like black d’hide, Toxic Blowpipe, etc. Only increase this further.
Because it’s so hard to get Rosewood Blowpipe on iron accounts, an MSB (or even better MSB(i)) is acceptable.
Dragon Scimitar loses a lot of time running between monsters, only recommended if you seriously CBA.
Note: If you do not have the slayer helm yet, replace it with Black Mask (i) - it must be imbued to work for range.
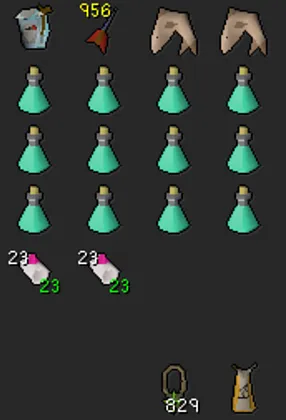
Inventory
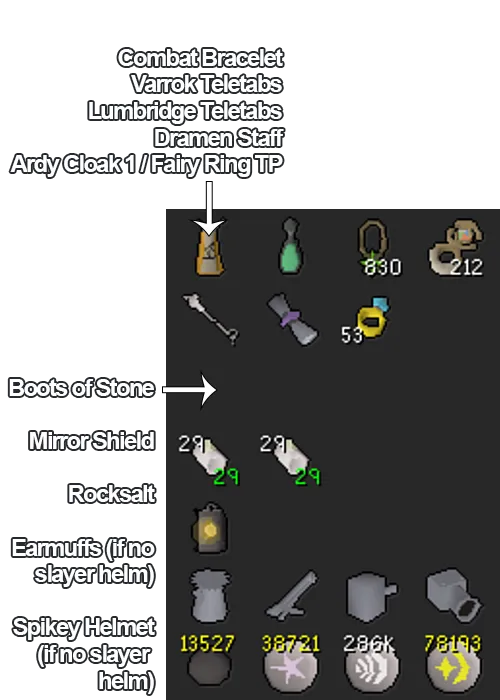
The inventory shown makes use of the PoH Jewelry Box, Teleport Portals to Lumbridge and Varrock, and the Lumbridge and Draynor Elite Diary to save invetory space.
You will also need to bring the Boots of Stone to kill Sulphur Lizards, Mirror Shield to kill Cockatric, and Rock Salt to kill Rock Slugs.
Pre-slayer helm, you will also need to bring Earmuffs to kill Banshees, and a Spikey Helmt to kill Wall Beasts.
Note: Before setting up your Mazchna Block List you may also need fishing explosives (to kill Mogres) and insulated boots (to kill Killerwatts).
Phase 1 Execution - The Slayer Point Loop

1. Use NPC Contact spell on the Lunar Spellbook to talk to Mazchna and ask him for a Slayer Task
Average time to complete a Mazchna task = 200 seconds (including travel), 6 points per task.

2. Complete the task, relatively quickly since Mazchna assigns easy monsters.
Use your teleport items to get there quickly. Equip expeditious bracelets. Shred with blowpipe. LINK Check out this article for a quick list of how to get to different monster locations.

3. Every 50th task (50, 100, 150, etc.), do one Konar Quo Maten slayer task.
You get a huge point boost for doing 50th tasks at Konar.
270 / 450 / 630 for each 50th, 100th, 250th task, respectively.
Note: Deposit your Mazchna gear and just grab whatever you need to do the Konar task. Do it even if it sucks, because you’re getting a ton of points for it.
4. Repeat
That’s it. That’s the method.
See below for the most efficient order for Slayer unlocks. Use your points as you get them, since blocking Mazchna tasks and unlocking things like superiors will increase points/hr and xp/hr.
Spending your Slayer Points
When you first the slayer skipping process, priorize blocking another monster at Mazchna as soon as you save up 50 points until your block list is full.
That means for your first 200 points, you are blocking tasks at Mazchna to speed up the “Slayer Points Farming” process.
Definitely block
- Mogres
- Shades
- Killerwatts
- Ice Warriors
If you have more blocks available (from having 300 quest points, or the Lumby/Dryanor Elite Diary), choose your pick from this list:
Catablepon, Cockatrice, Skeletons, Wall Beasts, Dogs
Note: Cockatrice and Wall Beasts are the theoretical slowest tasks from these choices.
Optimal Unlock Order
Save this many points for Phase 2
Quality of Life / Optional Unlocks
Double check that you do not have any Slayer Unlocks spent on things that give you more types of tasks.
Seeing Red, Watch the Birdie, Hot Stuff, Reptile Got Ripped, Actual Vampyre Slayer, Warped Reality, Lured In, Wings Spread - these should be OFF.
Like a Boss, meh I’d keep it on if you’re interested in bossing.
Phase 2 - Efficient Slayer Training
If you completed the process above, you should be ~63 slayer.
While you are below 65 Slayer, I highly suggest you complete all Bloodveld tasks in the Catacombs of Kourend until you are 65 Slayer.
Prior to 80 slayer, Chaeldar gives the best odds (~10%) at giving a burstable slayer task. We will be focusing on Chaeldar slayer, but I’ll provide a blocklist for Duradel too.
Chaeldar Blocklist
Before beginning, physically head to Chaeldar and block as many of the following tasks as you can, in this order.
Custodian Stalker
(if completed Shadows of Custodia quest)
Turael Blocklist
We’ll need to set up a good Turael block list since we’ll be using him to “skip” tasks.
You must block Kalphite here for him to be able to skip Kalphite tasks. If you don’t block Kalphite, have fun killing 183 workers. Idiot.
Dogs
Duradel Blocklist
At 80 slayer, we start using Duradel as a slayer master since Chaeldar can’t assign Nechryaels. Well done my boy, you’ll never have to kill another jelly again.
Dark Beasts
(if 90 slayer)
Cave Kraken
(if 87 slayer)
NPC Contact Chaeldar (or Durdel if above 80 slayer)
You should have the same inventory/gear from Phase 1 (Lunar Spellbook), ready to do quick and easy tasks repeatedly.
If you get a Jellies/Dust Devils/Nechryael/Abyssal Demon task, kill them using the Bursting Quickguide method shown below.
This means you will have to switch to the Ancients Spellbook.
If you do not get a burstable task, then NPC Contact Turael to “skip” your task. Do his task quickly, and repeat the process.
If you are not an ironman, a quick way to swap between Spellbooks is at the Rimmington House Portal in World 330. Enter someone else’s house and use their Occult Altar.
Bursting Quickguide
Gear
For the gear, you want to prioritize prayer bonus for chest/legs, and magic damage % for the rest of your gear. You will need a staff/wand that can autocast ancients.
Always wear a bracelet of slaughter and bring extras in your inventory!
Inventory
For your inventory, make sure to bring cheap darts (mithril shown) and Ava’s device. You will use these to “tag monsters” quickly. Bring a couple emergency food, a bunch of prayer potions, teleports and extra bracelets of slaughter.
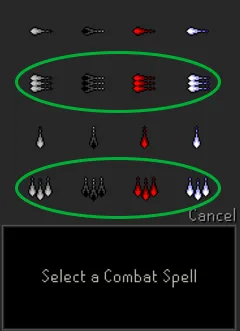
Spells
Make sure you’re on the Ancients spellbook. Then, autocast the highest level Burst or Barrage spell you can cast.
Video example
Our webhost informed us that we have to limit our video to “shit tier quality,” but this only exists to get the point across.
1. Always make sure the correct Protect prayer is on, and that you have plenty of Prayer Points left.
2. Equip Ava’s + Darts and quickly tag all monsters.
3. Run back/forth on a wall to stack them into a single tile.
4. Equip staff + magic cape and make sure Auto Retaliate is on.
Repeat.
Why Chaeldar?
I said this guide wasn’t for explanations, but I’m going to head off some of the dumbest questions and answer the obvious “Why Chaeldar? Torvesta said you’re supposed to use the highest level Slayer Master you have access to.”
Well, Torvesta is an idiot.
The fastest slayer XP will come from bursting, Chaeldar is the only Slayer master with a 10% chance to assign a burstable task before 80 Slayer (Jellies and Dust Devils).
Once you’re 80 slayer, you can transition to Duradel who will now assign Nechryaels and Dust Devils.
Congratulations
If you made it to the end of the guide, then great job. It was a long one, but very much worth understanding and executing.
If you have feedback, talk to Sploosh or join our community over on the Contact page.